Pages

Saturday, March 31, 2012

Twisting in Full Color

God knew what he was doing when he created the rainbow after the flood.  I mean what else could he do to show his love to Noah and his family after 40 long days of dreary rain.  I think purple is my favorite with all others a close second.  It is so hard for me not to add several colors to each of my quilts.  As all of my lovely Sitchin' Sisters know, I love batik fabrics above all.  They are so vibrant and the color combinations that can be in a single piece of fabric are endless.  

Twisting in the Summertime
The twisting in full color quilts were made with the Lil' Twister template. The instructions provided are very easy to follow and made the quilt assembly fun and easy.   I started by using some graph paper and planned out where my colors would go.  I wanted the background to be a series of black and white prints that transitioned from dark in one corner to light in the opposite corner.  Then my beautiful batiks would be in the foreground and would just 'pop' off the quilt.  To add a little more interest, I also put a black square in the lighter corner and a white square in the dark corner.  


Once I had a plan visualized, I cut out my squares and laid them out. This would be a good time to use a design wall.  I was on a retreat when I did this so I just took pictures of it so I could pick the pieces up.  Now it is time so sew!!!
Once the squares are all sewn together, then the template is used to cut out the pieces according to the instructions and then they are sewn together in the same order they are cut out.  It is a bit weird to cut something up that you just put together, but the outcome is awesome.  

Twisting in Springtime

This is a second quilt that I made for a dear friend.  It was made using Moda's Happy Fabric line.  The squares were assembled in a random fashion and then the template was use to once again cut and sew back together.


So don't be afraid to use a bit of color! It's a good reminder that any storm won't last forever and that God is always near!


'B' is for Bubblegum, 'C' is for Cake!!!

Hey Y'all!!!  I'm starting this post with a southern flair since this cake idea came from the lovely and talented Paula Deen.  When I saw the bubblegum cake in her magazine a few years ago, I knew I had to make it for my daughter.  I mean, what little girl wouldn't just love a neon pink cake?

The recipe called for some bubblegum flavored ice cream, chocolate cake, pink food coloring, and a whole lot of bubblegum.  For the ice cream, I make a simple vanilla ice cream and added some bubblegum flavoring and pink food coloring.  The summer I made this cake we stopped at a Amish country store and found the bubblegum in all different colors and sizes.
Bubblegum Birthday Cake
 After the cakes were baked,  I put them in the freezer.  Then the ice cream was layered in between the cakes.  The butter cream frosting went on fairly easy and then the bubblegum was added in a random order.
Yum! Chocolate Cake and Bubblegum Ice Cream
I never thought that chocolate would go well with bubble gum, but it was really good.  But then again what doesn't go well with chocolate.  Thanks again, Paula Deen,  this cake was a hit!

Monday, March 26, 2012

A Rural Farmscape..

As a daughter of two very talented art teachers, I grew up watching both of them make beautiful creations and passing their love of art to the next generations.  Both had areas that they loved; my mom made the neatest ceramics and my dad painted many oil paintings.  Many of these paintings centered around a specific theme, rural scenes and many round barns. So my quilt, "Farmscape", was my gift to him one year for his birthday.  Once again I knew what I wanted to do but really didn't have a plan on how to put it all together.  Not that it stopped me from jumping right in, of course.
Farmscape Quilt with a Round Barn

I built the background of the quilt in three sections.  The top portion of the sky was put together by sewing horizontal strips together.  Then the middle section of the sky and mountains was made by squares and half-square triangles.  The land is a series of vertical strips sewn together and then was attached to the middle section using a blanket stitch.  

The lake and the tree trunk were drawn onto some fusible interfacing and attached to the tree fabric.  Once the paper was removed from the back, they were positioned onto the background and then blanked stitched all around.  The leaves were applied in the same manner, using different greens and sizes of leaves to add dimension.  The barn and tractor were assembled together and then attached to the background with a blanket stitch.  Once all of the pieces were attached, I embroidered the grass around the structures.

The quilt was assembled and quilted with swirling circles in the sky and some 'grass-like' stitches in the  lawn.  The border fabric was an awesome find and around the edges I quilted the name of the quilt 'Farmscape' all around the edge of the quilt.

It took me about 6 months to finish this quilt,  but it was an awesome challenge and I definitely learned a lot on this one.

Sunday, March 25, 2012

A Yummy Sunfower


Did you know that the state flower of Kansas is the sunflower? Well, sunflowers also make very yummy and cute cakes! My mom came up with idea of doing a sunflower cake for one of my daughter's birthday and so we went straight to work.
Thankfully, the local confectionery store has large selection of masonite boards for cakes of all sizes.  I used 2- 10" in round cake pans for the head of the flower and in between the two cakes layers we put frosted triangle cookies for the petals.  The flower is covered with chocolate and peanut butter chips.  The stem and leaves were cut from two 9x13 rectangle cakes after they were frozen.
One thing to keep in mind when you make one this big is where it will be stored.  It did make it into the fridge, but just barely.  Overall, this was a fairly easy and fun cake to make.


Friday, March 23, 2012

Twin Quilts


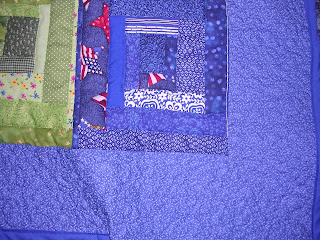
The Log Cabin quilt is a favorite pattern of many quilters.  So many different looking quilts can come from using the base block.  These two were my first log cabin quilts, christmas gifts for two twin sisters in my extended family.  I wanted to give them a bit of pizzazz so I made the strips different widths and kept sewing until each block was larger than the desired block size.  Making them different widths also helped in hiding imperfections that were still abundant.  Most of my quilts are scrappy like these two; I love the added dimension it gives to each quilt.


Beginnings...

Okay so I'm going to start this blog thing like I start everything else in my life...with my eyes closed.  I think I mentioned that I don't like to read instructions before I start anything,  only when I get into trouble do I open the manual.  So it goes the same with my cakes and quilts,  I think I bought my first quilt book four or five years into sewing little pieces of fabric together.  At least with cakes, I knew how to make one and put candles in it.  It did take a few disasters to learn that you had to let the cake COOL before frosting it.  Patience isn't my gig.  I mean how hard could it be?

I got the brilliant idea of making a quilt when my daughter was about to turn three. I found some bright fabrics and came up with a simple design and started right in.  I had a cheap sewing machine and knew nothing of 1/4" seams and any other well known quilting technique.  So I started cutting squares (with scissors) and a paper template and sewed them together.
My First Quilt
As I sit in my quilting classes now, there is usually one person who is making their first quilt.  Their quilts look professional compared to this one,  but my daughter loved it so I guess that's all that matters.  Well, that and I bet there is no other one quite like it.

As for my first cakes, they didn't turn out quite as lop-sided as my first quilt.  My son's first birthday had a sports theme and the cakes turned out pretty good.  My mom had taken classes and had showed me that if you freeze the cakes you could shape them.  Good tip.  

So this was my starting point and to this day still love making quilts and making birthday cakes.  In less than a week, I will be making another birthday cake.  I bought all of the supplies today and as my son laid his eyes upon the very large tub of buttercream frosting (Yum!!)  his face lit up like the number of candles that now show up on my cakes.

Thursday, March 22, 2012

Cakes and Quilts by Chelle

My great grandmother was an avid quilter.  Back in those days they had quilting bees and salvaged fabric.  I was given one of her precious quilts when I was child and as I got older I thought that it was such a blessed piece of history as well as a piece of her.  After I had my first child, I wanted to give her the same blessing (Although I had a LOT to learn on how to make a quilt).

My other blessing came from our family birthdays growing up.  Always a party and always a homemade cake.  So again, I wanted to share this blessing with my children.

As a daughter of two very artistic and creative parents, the sky was the limit with anything i thought to make up as a kid.  So why stop now?  Do to the space constraints of my house, I had to limit my creativity to two things: Cakes and Quilts.  What could be better anyway?  My day job as an electrical engineer equips me with some problem solving techniques which is really needed when I, like my fellow engineers, do first and then read the instructions.  Oh well, here is the good, the yummy, and the flops....